Chrysler Resto-blog part 2

IMG_7524-cr-logo

It was almost a year, that the new engine and transmission arrived. This due export problems, which had to be solved in person! As you can read, it’s not always easy to get what you want. Meanwhile we could do some…. have a look for yourself at some pictures we did not posted before.

ใช้เวลาเกือบปีที่เครื่องยนต์ใหม่และเกียร์จะมาถึงเรา เนื่องจากปัญหาด้านการส่งออก ซึ่งต้องแก้ไขต่อไป อย่างที่คุณเห็น มันไม่ง่ายเลยที่จะได้ในสิ่งที่คุณต้องการ ในขณะที่เราพอทำอะไรได้บ้าง คุณลองดูภาพเหล่านี้ที่เราไม่เคยโพสต์มาก่อน

IMG_5992-cr-logo

IMG_5906-cr-logo

IMG_5242-cr-logo

IMG_6001-cr-logo

IMG_6069-cr-logo


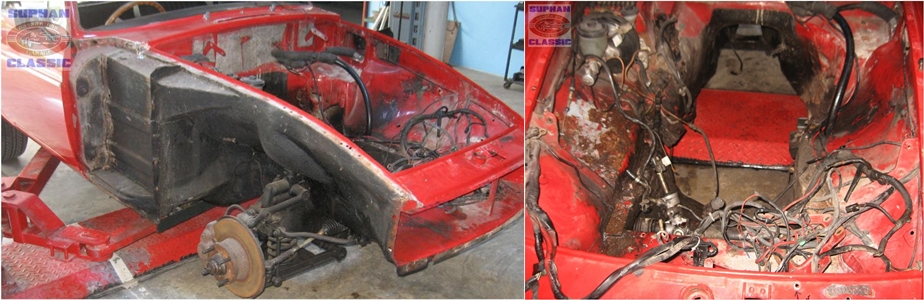
The Chrysler was hit hard by time, the pictures speak for themselves. The saloon wasn’t even straight anymore, its not to say what has happened during the years. It took a lot of effort to make this car 100% again.

Chrysler ผุพังไปตามเกาลวลา ภาพจะเป็นตัวเล่าเรื่องได้เป็นอย่างดี ตัวรถไม่ตรงอีกต่อไป ต้องใช้ความพยายามอย่างยิ่งที่จะให้รถกลับมาดี 100 เปอร์เซ็นต์อีกครั้ง

IMG_6108-cr-logo

IMG_6113-cr-logo

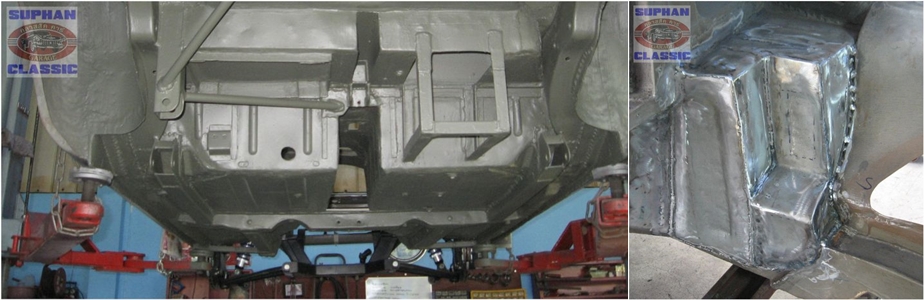
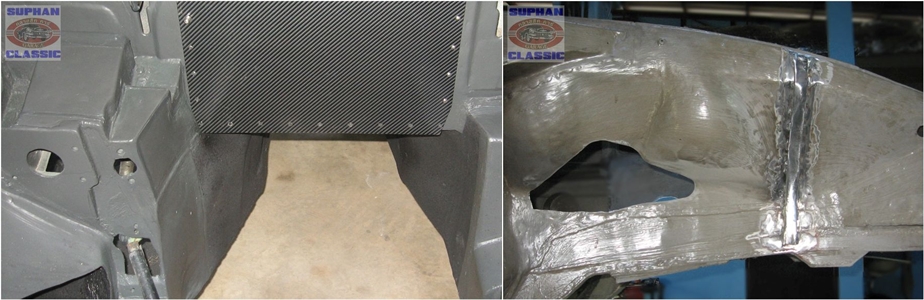
The best option is to sandblast all the metal parts. This way we can see clearly how the condition is of the steel. We have corrected and repaired the body on to the millimetre. The doors and windows needed special hand fabricated tools (see blog before) to reach the goal. Every irregularity in the plate material has to be corrected, all by hand.

ทางเลือกที่ดีที่สุดคือการพ่นทรายในส่วนที่เป็นโลหะทั้งหมด วิธีนี้ทำให้เราเห็นได้ชัดว่าเหล็กมีสภาพอย่างไร เราได้แก้ไขและซ่อมแซมตัวรถทุกมิลลิเมตร การซ่อมประตูและหน้าต่างต้องใช้เครื่องมือพิเศษที่ต้องประดิษฐ์ขึ้นเองด้วยมือ (ดูจากบล็อกที่แล้ว) แผ่นเหล็กที่ผิดปกติทุกชิ้นต้องได้รับการแก้ไขด้วยมือทั้งสิ้น

IMG_7161-cr-logo

IMG_7183-cr-logo

IMG_7184-cr-logo

IMG_7522-cr-logo

IMG_7523-cr-logo

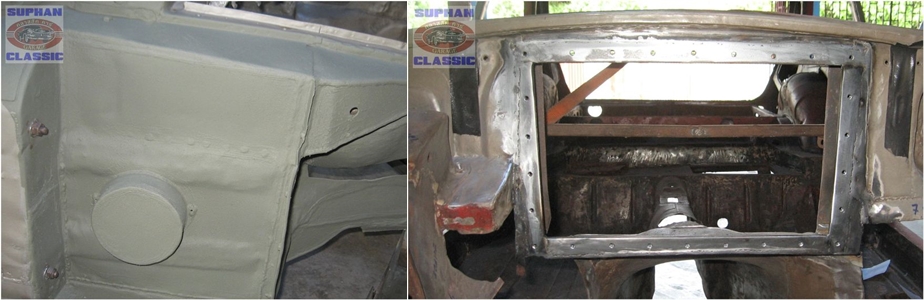
The Valiant went to one of the best classic painters of Thailand. One job at the time, prepare on too the smallest detail for a top result. Quality cost time and money. Top quality paint ain’t cheap either.

เราได้นำ Valiant ไปให้ช่างทำสีที่ดีที่สุดในประเทศไทย ค่อย ๆ ทำไปทีละส่วน งานที่ดีมีคุณภาพต้องใช้เวลาและทุนทรัพย์ สีที่มีคุณภาพยอดเยี่ยมก็มีราคาไม่ถูกเช่นกัน

IMG_7629-cr-logo

IMG_7633-cr-logo

IMG_7647-cr-logo

IMG_7657-cr-logo

IMG_7661-cr-logo

IMG_7721-cr-logo

IMG_7777-cr-logo

IMG_7789-cr-logo

IMG_7815-cr-logo

IMG_7819-cr-logo

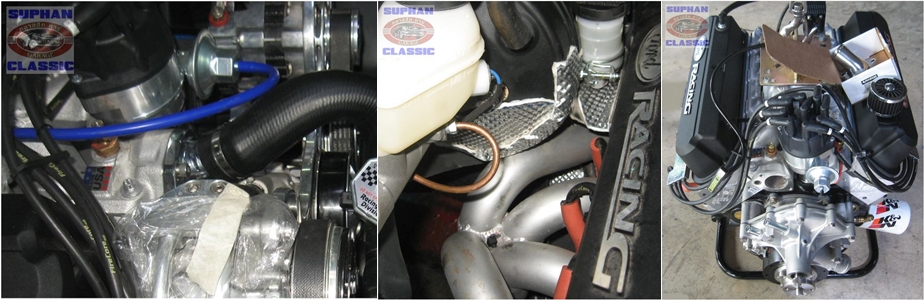
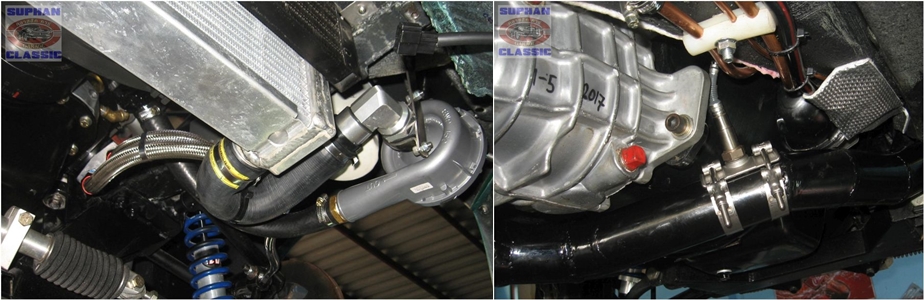
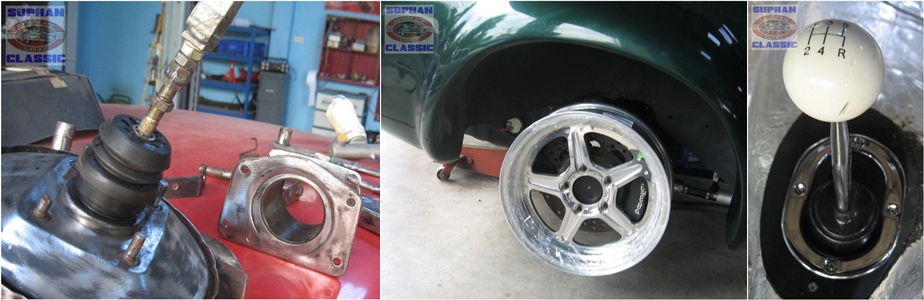
Here a few pictures of the rebuild, understand we still not received the engine and transmission. That you will read in the final part of this build.

นี่คือภาพของการวางเครื่องใหม่ซึ่งเรายังไม่ได้เครื่องและเกียร์มา คุณสามารถติดตามอ่านต่อได้ในตอนท้าย

IMG_8185-cr-logo

Dodge Dart 1965

IMG_8359-cr-logo

We were honored to be asked to make this beautiful car drive able again. We have serviced the whole car, including the electric wiring. Now it’s safe and running very well with it’s 1-JZ engine. So smooth again.

เรารู้สึกเป็นเกียรติอย่างยิ่งที่ได้ทำให้รถคันงามนี้กลับมาใช้งานได้อีกครั้ง  เราให้บริการรถทั้งคัน รวมถึงการเดินสายไฟ ตอนนี้รถมีความปลอดภัยและขับได้ราบรื่นดีด้วยเครื่องยนต์ 1-JZ

IMG_7842-cr-logo

The Dart name originally appeared on a 1956 Chrysler show car featuring a streamlined body designed by the Italian coachbuilder Carrozzeria Ghia. It was produced from 1960 till 1976. The Dart became smaller during the years, from full size sedan to mid-size and this one is the compact. The compact used to be equipped with a straight six engine, which later on became a small block V8.

ชื่อ Dart ปรากฏขึ้นครั้งแรกในงานจัดแสดงรถ Chrysler  ปี พ.ศ. 2499  รถมีรูปทรงที่สามารถแล่นผ่านอากาศได้สะดวก ซึ่งออกแบบโดย Carrozzeria Ghia  บริษัทอิตาเลียนผู้สร้างตัวรถ (คล้ายรถม้า)  มันถูกผลิตขึ้นระหว่างปี พ.ศ. 2503 – 2519  Dart มีขนาดเล็กลงไปเรื่อย ๆ จากขนาดซีดาน ปรับเล็กลงไปเป็นขนาดกลาง และรถยนต์นั่งคันนี้ก็มีขนาดเล็กลงไปกว่าเดิม รถยนต์นั่งขนาดเล็กใช้เครื่องยนต์หกเครื่องเรียงต่อกันเป็นระนาบ ต่อมาพัฒนาเป็นเครื่อง V8

IMG_7846-cr-logo

IMG_8117-cr-logo

IMG_8118-cr-logo

IMG_7871-cr-logo

IMG_8240-cr-logo

After a general inspection we decided to start with safety first. Suspension and brakes. The car seems to be a barn find, so we had to take it all apart, renew, repair and test. The fuel tank was a mess, this often happen with classic cars and usually forgotten to replace or maintain. Did you know that fuel of 6 months old can’t be used again?

หลังจากเราตัดสินใจที่จะเริ่มจากความปลอดภัยเป็นอันดับแรก คือ ระบบกันสะเทือนและเบรก ดูเหมือนว่ารถจะถูกจอดเก็บไว้เป็นเวลานาน เราต้องถอดชิ้นส่วนรถออกมา เปลี่ยนอะไหล่ ซ่อม และลองขับ ถังน้ำมัน ซึ่งรถคลาสสิกมักจะถูกละเลยในการเปลี่ยนอะไหล่หรือขาดการบำรุงรักษา คุณทราบหรือไม่ว่าน้ำมันที่ทิ้งไว้นานถึง 6 เดือน ไม่สามารถใช้ได้อีกต่อไป

IMG_8205-cr-logo

IMG_8048-cr-logo

IMG_8269-cr-logo

Lucky there was a 1-JZ under the hood, strong reliable engine made by Toyota. This engine needed maintenance! Doing so, we discovered a few problems with the wiring. We also made the cluster work and gave it a ferm overhaul.

โชคดีที่รถมีเครื่อง 1-JZ ซึ่งเป็นเครื่องยนต์ที่วางใจได้ในเรื่องแข็งแกร่งทนทาน ซึ่งผลิตโดย Toyota เครื่องยนต์จำเป็นต้องได้รับการบำรุงรักษา เราได้พบปัญหาบางอย่างเกี่ยวกับการเดินสายไฟ เราได้ทำความสะอาด ซ่อมแซมเกจ์ทำให้สามารถใช้การได้ดีกับเครื่องยนต์ใหม่

IMG_8362-cr-logo

One more happy customer!

ลูกค้าที่มีความสุขอีกท่านหนึ่ง

Chrysler Resto-blog part 1

IMG_5247-cr-logo

This page is about the disassembling of a 1971 Chrysler Valiant VH series produced in Australia. The car is in a bad shape, looks like it was stored outside for many years. The only option we had, is to take it apart until the last bold, have it sandblasted to locate all bad parts of the chassis.

หน้านี้เป็นเรื่องเกี่ยวกับการถอดแยกชิ้นส่วนรถ Chrysler Valiant VH series รุ่น ปี ค.ศ. 1971 ซึ่งผลิตในประเทศออสเตรเลีย รถอยู่ในสภาพที่แย่ เหมือนกับถูกจอดทิ้งไว้กลางแจ้งหลายปี ทางเลือกเดียวที่ทำได้ คือ ถอดแยกชิ้นส่วนรถจนเหลือแค่น็อตตัวสุดท้าย นำมาขัดทรายเพื่อหาตำแหน่งของโครงรถและเพลาที่เสีย

IMG_5233-cr-logo

IMG_5241-cr-logo

IMG_6073-cr-logo

IMG_6558-cr-logo

After sandblasting we started to cut out the rotten parts and replaced them with new. Most parts we had to make by hand and welded in.

หลังจากการขัดทรายเพื่อขจัดสิ่งสกปรกบนพื้นให้สะอาดแล้ว เราเริ่มตัดส่วนที่ผุหรือเป็นสนิมออก แล้วแทนที่ด้วยอะไหล่ชิ้นใหม่ อะไหล่ส่วนใหญ่เราทำเองด้วยมือและเชื่อมเข้าไป

IMG_6129-cr-logo

IMG_6131-cr-logo

IMG_6137-cr-logo

IMG_6214-cr-logo

IMG_6321-cr-logo

IMG_6672-cr-logo

It is most important to protect the steel from oxidation. So after sand blasting we spray the car with a special anti-rust base paint, after that even more different coatings.

สิ่งสำคัญที่สุด คือ การป้องกันเหล็กไม่ให้ขึ้นสนิม หลังจากขัดทรายเสร็จแล้วเราใช้สีสเปรย์กันสนิมชนิดพิเศษพ่นและใช้วัสดุเคลือบผิวต่าง ๆ อีกหลายชั้น

IMG_6591-cr-logo

IMG_6687-cr-logo

IMG_6679-cr-logo

Because we need a rolling chassis, we restored all axles, suspension and other important parts. Most inconvenient when you have a dead weight to work with. Not only for us, but for other disciplines as well, like the sand blaster and the paint shop to start with.

เพราะเราต้องเราซ่อมระบบขับเคลื่อนช่วงล่าง เพลา ระบบกันสะเทือน และชิ้นส่วนสำคัญต่าง ๆ การทำงานค่อนข้างไม่สะดวกนัก ถ้าไม่สามารถเคลื่อนย้ายสิ่งที่มีน้ำหนักมาก ๆ ได้ ไม่เฉพาะกับเราเท่านั้น แต่รวมไปถึงช่างขัดทรายแ ละแม้แต่ร้านทำสี ก็ประสบปัญหาเช่นเดียวกัน

IMG_6378-cr-logo

IMG_6464-cr-logo

IMG_6375-cr-logo

IMG_6277-cr-logo

A good resto job, is about planning. Where to start, what comes next? Some items have to be done before the car can have a paint job. Not only the rolling part, but things like the windows, doors or the seats. Have them 100% restored and placed in position. Doing those kind of repairs after the car is painted, you will shoot yourself in the foot.

การซ่อมที่ดีนั้นเริ่มจากการวางแผน ว่าควรเริ่มจากตรงไหน อะไรเป็นลำดับต่อไป บางส่วนต้องเสร็จก่อนที่จะทำสี ไม่ใช่แค่ระบบขับเคลื่อนเท่านั้น แต่พวกหน้าต่าง ประตู หรือเบาะ ควรที่จะซ่อมให้สมบูรณ์ 100 เปอร์เซ็นต์ และประกอบให้เข้าที่ เพราะถ้าซ่อมหลังจากทำสีแล้วจะทำให้เกิดผลเสียโดยไม่จำเป็น

IMG_6553-cr-logo

IMG_6583-cr-logo

IMG_6623-cr-logo

IMG_6674-cr-logo

IMG_6698-cr-logo

IMG_6693-cr-logo

If you would like to have more detailed information, I suggest you visit the Wikipedia page.

หากคุณต้องการข้อมูลเพิ่มเติม ผมขอแนะนำให้สืบค้นจาก Wikipedia ครับ

https://en.wikipedia.org/wiki/Chrysler_Valiant

IMG_6146-cr-logo


Pontiac Starchief 1957

scan0018-cr-logo

It has been a while that we did this beautiful car. We took the car apart until the last bold, repaired the chassis and rebuild it. We used new parts and reconditioned parts. There are only a few pictures to show, due the loss of a hard drive.

นานแล้วที่เราได้ซ่อมรถคันงามนี้ เราได้ถอดชิ้นส่วนรถออกจนถึงกลียวน็อตตัวสุดท้าย ซ่อมโครงรถให้ดีเหมือนเดิม เราใช้อะไหล่ใหม่และปรับปรุงสภาพรถให้ดีขึ้น เนื่องจากฮาร์ดไดรฟ์ได้รับความเสียหาย จึงเหลือภาพให้ดูเพียงไม่กี่ภาพ

scan0016-cr-logo

scan0012-cr-logo

scan0014-cr-logo

scan0010-cr-logo

scan0009-cr-logo

scan0013-cr-logo

Done!

scan0011-cr-logo


Custom MG with power pack!

IMG_4786-cr-logo

I consider this project as a double one, restoring the car and modify it. The customer provided all the special parts, along with the MGB of 1967. The start of this project was a bit disappointing, the chassis of the car was in a terrible condition, this has to be fixed first.

ผมได้รวม 2 โครงการเข้าด้วยกัน คือ การยกเครื่องและแต่งรถ ลูกค้าจัดหาอะไหล่ที่ต้องการเป็นพิเศษ รวมไปถึง MGB ปี 2513 ด้วย ตอนเริ่มโครงการนี้ไม่น่าพึงพอใจเท่าไรนัก เนื่องจาก เพลารถอยู่ในสภาพที่แย่มาก ซึ่งต้องซ่อมก่อนเป็นสิ่งแรก

colage-924-old1

colage-924-old2

colage-924-new1

colage-924-new2

colage-924-new3

Before the MGB could see the paint shop, we had to fit all new major parts like axles, engine, gearbox, wheels and even a wide-body kit. Wow! Fitting in a huge engine in such a small car, was really a challenge. The Ford V8 was provided by Ford Motorsports, along with the 5 speed manual transmission.

ก่อนจะนำ MGB ไปทำสี เราต้องประกอบชิ้นส่วนสำคัญต่าง ๆ เช่น เพลา เครื่องยนต์ เกียร์ ล้อ และชุดแต่ง การประกอบเครื่องยนต์ใหญ่ ๆ ในรถคันเล็กเป็นสิ่งที่ท้าทายอย่างมาก รถฟอร์ด V8 ที่ฟอร์ด มอเตอร์สปอร์ตผลิตขึ้นนั้นเป็นรถที่มาพร้อมเกียร์ธรรมดา 5 จังหวะ

colage-924-engine

When a car is modified to a huge amount of power (450hp) it is advisable to adapt everything to handle that amount of power. Suspension, axle, brakes and perhaps a roll-bar if the car is used on the circuit. We always advise our customers about safety.

เมื่อรถถูกแต่งให้มีกำลังเพิ่มขึ้น (450 แรงม้า) ควรปรับเปลี่ยนส่วนประกอบอื่น ๆ ให้เหมาะกับกำลังของรถที่เพิ่มขึ้นด้วย เช่น ระบบกันสะเทือนของรถ  ช่วงล่าง เพลา เบรก และอาจใช้โรลบาร์สำหรับรถแข่ง เราคำนึงถึงความปลอดภัยของลูกค้าเป็นอันดับแรกเสมอ

stabilisator 005-cr-logo

colage-924-sus

The final stage to assemble the car took some work too, whole new interior, electric system, gauges, you name it. We did this with pleasure!

ขั้นตอนสุดท้ายในการประกอบรถนั้นมีหลายอย่าง ตั้งแต่ตกแต่งภายในใหม่ ติดตั้งระบบไฟฟ้า  รวมถึงเกจ์ เรายินดีทำอย่างเต็มที่!

IMG_5505-cr-logo

colage-924-built1

colage-924-built2

Done!

IMG_4937-cr-logo